Redi-Rock Barrier Wall Design Resources
Redi-Rock makes barrier walls simple. With multiple configuration options, dedicated design resources, and expert engineering support, you can confidently design and install barrier walls that meet your project’s needs.
New to Redi-Rock barrier walls?
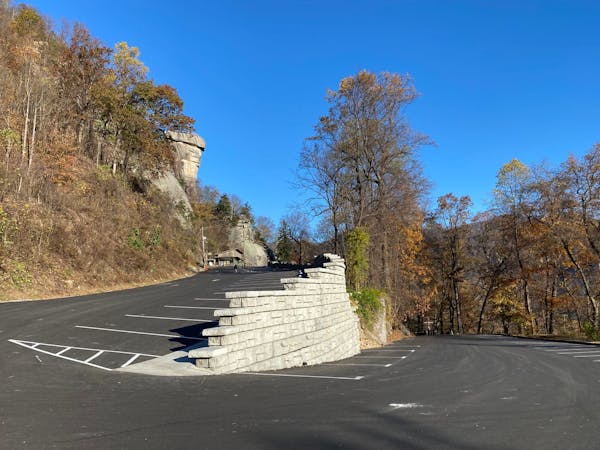
A barrier retaining wall – also known as a parapet – is a vertical extension added to the top of a retaining wall or bridge. It enhances safety by helping prevent accidents and property damage. In transportation projects, a highway barrier wall serves a similar role, acting as a guardrail to protect vehicles and pedestrians.
Types of Barrier Walls
Details can get technical depending on your site conditions. For the best results, connect with the Redi-Rock engineering support team. We’ll help you navigate your project’s specific requirements.
Barrier Wall using Freestanding Hollow Core (F-HC) and 41 in (1041 mm) Hollow-Core blocks (41-HC)
Barrier Wall using Freestanding Hollow Core (F-HC) tied to positive connection blocks - 28 in (711 mm) PC or 41 in (1041 mm) PC - for enhanced connection and strength
Cast-in-Place walls featuring Redi-Rock blocks and caps as top-of-wall guards and barriers
Can you build a fence on top of a Redi-Rock wall?
Absolutely, but it’s important to note that a fence is considered an accessory, not a barrier wall. Redi-Rock’s Freestanding Hollow-Core blocks are designed to make fence installation easy, and Column blocks can also be used to support fencing where needed. View Accessory solutions.
Barrier Wall Engineering Simplified
Until now, engineers have been hard pressed to find guidance in parapet barrier wall design. The results of Redi-Rock’s recent barrier testing can now be applied to design projects, ensuring American Association of State Highway and Transportation Officials (AASHTO) and International Building Code (IBC) load requirements are met. Watch the video below outlining our testing process and results.
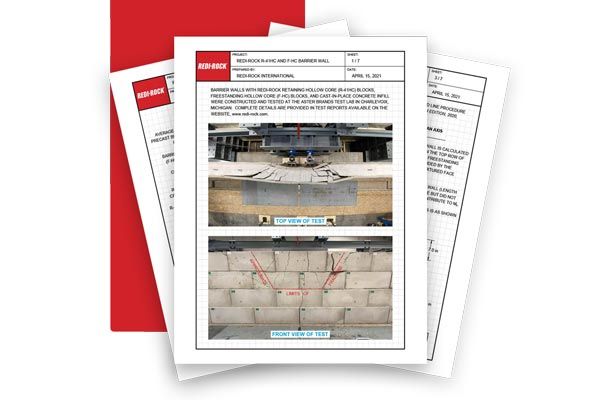
Barrier Wall Testing Reports
Multiple phases of testing were conducted in the Aster Brands Lab in Charlevoix, Michigan, on barriers constructed with Redi-Rock hollow-core, precast modular blocks. The aim of the tests was to verify and validate the yield line analysis methodology – which is outlined in Chapter 13 of AASHTO and assumes conventional cast-in-place concrete construction – holds true for the barriers constructed with a core of reinforced steel and cast-in-place concrete within precast modular blocks.
Phase 1: Capacity of a Unit Section of Barrier
Phase 1 testing was conducted to verify the failure modes and structural capacity of the joint between the stem and the base of the wall for a unit section of barrier wall. The flexural moment capacity about a horizontal axis is a key input in the yield line analysis methodology. We performed this test using a few different block and reinforcement configurations.
Phase 2: Flexural Strength Along a Vertical Axis
Phase 2 measured the flexural capacity about a vertical axis of a wall stem created from Freestanding Hollow-Core blocks. Two different load scenarios were tested to explore the effects of the precast modular facing on the capacity (as opposed to conventional cast-in-place construction). This capacity is the other key input in the yield line analysis methodology.
Phase 3: Performance of a Full-Scale Wall
Phase 3 testing of a full-scale barrier wall was used to confirm that the yield line methodology is valid for modular block construction and to compare our results with the theoretically computed results. The two test walls had slightly different support configurations, but the results ended up being very similar.
Barrier Wall Design Resources
Use the proven resources below to guide your design. Rely on the barrier wall construction detail and sample calculations provided to help you design a parapet barrier wall tailored to your specific application.
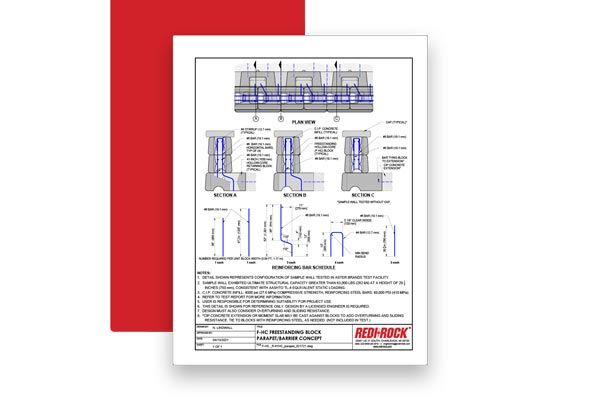
Results
Barrier walls constructed according to the Freestanding Hollow-Core Parapet/Barrier Concept detail are capable of resisting an AASHTO TL-4 equivalent static design force of 54.0 kips and exceed the capacity of International Building Code requirements for vehicle barriers.
Important Design Notes:
This testing data reflects the structural capacity of the wall, and barriers would also have to have to be designed to not overturn or slide due to the impact loading.
No vehicle performance impact testing was completed. No attempt was made to consider barrier shape or face texture. This barrier should only be used in low speed applications or in applications where it will not be subject to direct impacts from high-speed traffic.